 Legoaizer -
Help Legoaizer -
Help |
Legoaizer -
Help
Import and export
The application has everal options
to import and export, and print the results:
Open a new picture When a picture is read
and prepared for the application it will not be processed to a different size.
The origiunal size is kept. There is one exception: for pictures that are
larger than 1296 pixels (in width or height), the picture will be resized to
1296 pixels on the longest side, while the aspect ratio is kept intact. This is
only done in the application, and the original picture is untouched. The reason
to resize is very practical: the maximum size of a mosaic is 1296 x 1296
studs, and then it's no need to have more pixels available to determine the
colour. When the sophisticated Mosaizer engine is used, a different colour
matching algorithm is applied, and the internal size is not restricted to 1296
pixels any more, but to whatever size is required for the Mosaizer
engine.
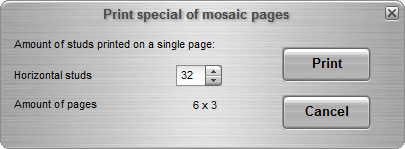
Save the resulting blueprint image The 'Print
special' will show an
additional pop-up that requires input over how many pages the result needs to be
printed. This feature offers the possibility
to accurately indicate how many and what size prints must be
made. The two numbers are the number of studs that should be printed
per page. In case of e.g. 32x32 stud base plates you can now distribute
the mosaic build amongst several workers that each build a part of the full mosaic on
a base plate. This feature only works correctly for brick mosaics, and
is therefore greyed out when a Ministeck® mosaic is detected. The
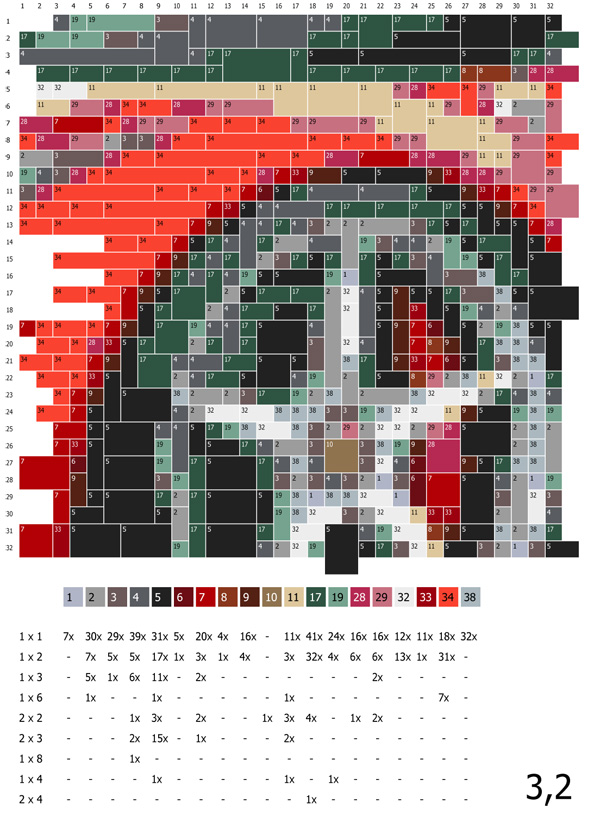
resulting pdf file contains not
only the mosaic output, it also provides the colour codes and the stud numbers
of the base plate. See example picture below. The Row and Column numbers are printed
in the left top corner for easy identification of the page position in the
full mosaic. Export Bricklink
wanted list Save and open Comma Separated Values (.csv) files You can
import and export .csv files from the manu bar: 'Colour
table' > 'Convert/Open .csv file'.
This feature is designed to conveniently edit RGB data of the bricks, price data
and amount data. The feature is less suited to create a new database from
scratch. To create a database from scratch can better be done by e.g. using
Standard Colours (see here for more details), or simply
starting from scratch (see here
for
details). Some basic rules if you choose
to use the .csv table edit feature: Open existing result folders Open existing result files Projects: read and
write The original table date is
always kept. In case you update the table (and temporarily discard cost and
amount data) it will be restored when you reselect a brick or colour again. This
is also valid for saving the table as a project (from which you can resume
later): all the original table data is kept and saved in the project file. This
is particularly useful when you start from e.g. your
favourite colour-brick combination table, and want to use this table to
optimize your brick usage and cost for that mosaic. When you are done or need to
stop, you can save the full dataset, including the bricks and colours you have
temporarily (de)selected in your tests. The project will store this data
(i.e. availability, amount and cost), and is fully restored again when you
decide to use that colour or brick after having resumed from your saved
project. Transfer of a
project In case
of Bricklink projects the transfer should be 100% correct, provided that the
target system has the same Bricklink dataset as the source system. An update of
the latest dataset (via main menu 'Colour table'
> 'Bricklink' > 'Show
Bricklink data' > 'Check for update'
button) should be done, prior to saving and transferring it to
other systems. Needless to say that also the same source picture must be present
on the target system.
Save
the
output as a picture (jpg or bmp)
Save
the output in an Excel spreadsheet (can also
be read by Open Office or similar)
Print the mosaic bitmap
Print
the output on several pages
in pdf file format (a free Acrobat reader or similar is
required)
Save the current state of
a project
Reload the project from a
previous session
The menu offers two options to
open (or: 'load') a source image that is used for the blueprint/mosaic.
The first option is to open a new image: 'File' ->
'New picture', which opens a pop-up window of your My
Pictures folder. navigate to the picture you want to open, and click the 'Open' button. Allowed
file types (extensions) are: .bmp, .jpg (.jpeg),
.png, .psd, .gif, .emf and .wmf. When an image has been opened, it
will be added to the history of opened file.
The second option is to open a previous picture: 'File' -> 'Open picture' and
then select one of the list of previously opened picture files. The most
recently used is always put on top.
The menu offer several options
to save and read back (open) saved results. In the picture below you can
see the two options for saving the image and the spreadsheet: 'Save mosaic'. This creates two files, an image and a
spreadsheet. The 'Print special' creates an acrobat ('.pdf') file, and is opened after
completing. This file format offers the possibility to print at any wanted size
without loss of sharpness of the brick or Ministeck® lay-out.

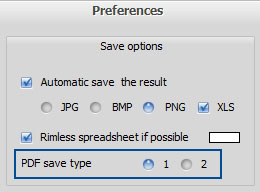
When you open the preferences
(Menu > Tools > preferences) you'll find
the 'PDF save type': there are two possible output format for pdf
save. The type 1 will save the build data for that page on a next page, type 2
will save the build data on the same page as the blueprint. Type 1 will
therefore avoid that for large amounts of different bricks and colours the
build/amount data gets printed off-page. Type 1 is the default, and this setting
is also remembered next time you open Legoaizer (as with most of all
general settings).
The full bricklist with colour data, price
etcetera can be exported in the Bricklink xml file format. This file can then
directly be uploaded via Bricklink website as your wanted list and continue to
buy your parts via Bricklink. This will only be effective when you have
created a fully compatible Bricklink brick-colour table. In case
colour and brick codes are not recognized you will risk an error via
Bricklink.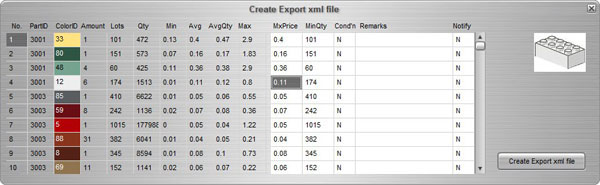
After
pressing this menu option an interface is shown in which you are requested to
complete the data for the xml file (picture above). On the left side (not
editable part) is the data that is currently available via the Bricklink website
on colours and prices. On the right side (white area) is the editable part of
the xml file. Most data is already filed in like requested amount, maximum
price, notifications and condition. In case you wish add a remark, you can use
the still empty column. If ready, then press the 'Create
Export xml file' button. The
file is stored in the same location as the mosaic picture and spreadsheet (the
'Results folder', as in 'Folders' in the main menu). In the top corner the
associated brick is shown when you click on a row in the editable area (here
referred to as 'PartID'
, basically the Bricklink part code for that brick
part).
A Comma
Separated Values file (.csv) file stores tabular data (numbers and text) in
plain text. Each line of the file is a data record. Each record consists of one
or more fields, separated by commas. The use of the comma as a field separator
is the source of the name for this file format (source: Wiki). These files are
featured for its convenient
editing in Excel. The use of this feature is quite limited:
You should never start a
file from scratch, unless you know what you are doing (the structure is very
specific, thus prone to errors)
The sequence of working
with these files is: you first convert an existing into the csv file,
then edit this file, and read the edited file again
Always first export an
existing table with the correct colours and bricks.
Create a copy of this
file, just in case errors are experienced when opening an edited file in
Legoaizer.
Always use Excel for editing. Don't use Notepad or other applications that
can read .csv files (it's after all just an ANSI text
file).
Assure that you only edit the table values that are found
in the .csv file. Do not enter a cell value outside the table (on the right or
below the last line of values). Do not replace or shift values. Do not insert
new rows or columns, except
when you
want to add new bricks or colours. The data structure is explained here.
In case no value is
shown in the table you can decide to add a value, but only if the empty cell
is part of the entire table (e.g. a brick-colour combination was not
available, but you want to make it available by the edit
action).
Do not use a comma
anywhere in the edited file. Commas are its separation characters and will
render your file unusable.
Always save the edited
table back in the same .csv format as it was opened. It's recommended to use
CTRL+S (or 'Save' from the ribbon) and click 'Yes' to save in the current
format 'to keep this format, which leaves out any incompatible
features').
After
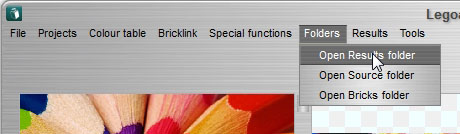
saving you can now open the resulting files by browsing to the save folder. It's
more convenient to use the feature in the main menu 'Open
Results folders'. See example below.
Another option to
see the result is to directly open the last saved file. This is done via the
main menu 'Results' and then 'Show saved mosaic' or 'Open saved
spreadsheet'. The latter is also shown in the picture
below. 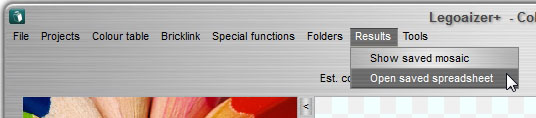
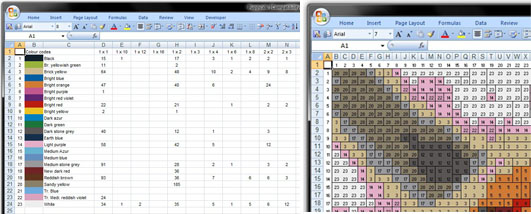
Picture above: the saved spreadsheet contains both the
colour codes, amounts and cost, but also a full overview in colour of the mosaic
and the colour code.
Projects can be saved and opened again.
This convenient way of working assures that you can tune and tweak your mosaic until
it's perfect, and work on this at your
convenience. The project file stores all the data that is used for your brick
mosaic: the bricks, type, size, cost, amount and colours, all relevant the current application settings,
and the results (basically the same data that is stored in the result spreadsheet + some
hidden data that is temporarily discarded). If the mosaic data
is available in the project file at the moment of saving, at project load
the mosaic is fully
rebuild.
The project is heavily dependent on data in local folders (such
as pictures) and although you can try, it will not be easy to transfer
a project to another computer. Most important: when you are not using a picture
database the transfer will work in most cases. In case of pictures, the project
contains links to your local folders that contain data. Unless your guest
computer has exactly the same structure an data you cannot transfer a project. The
projects are stored in a subfolder: see here for
details.